When you click on links to various merchants on this site and make a purchase, this can result in this site earning a commission. Affiliate programs and affiliations include, but are not limited to, the eBay Partner Network.
Price: $25.99
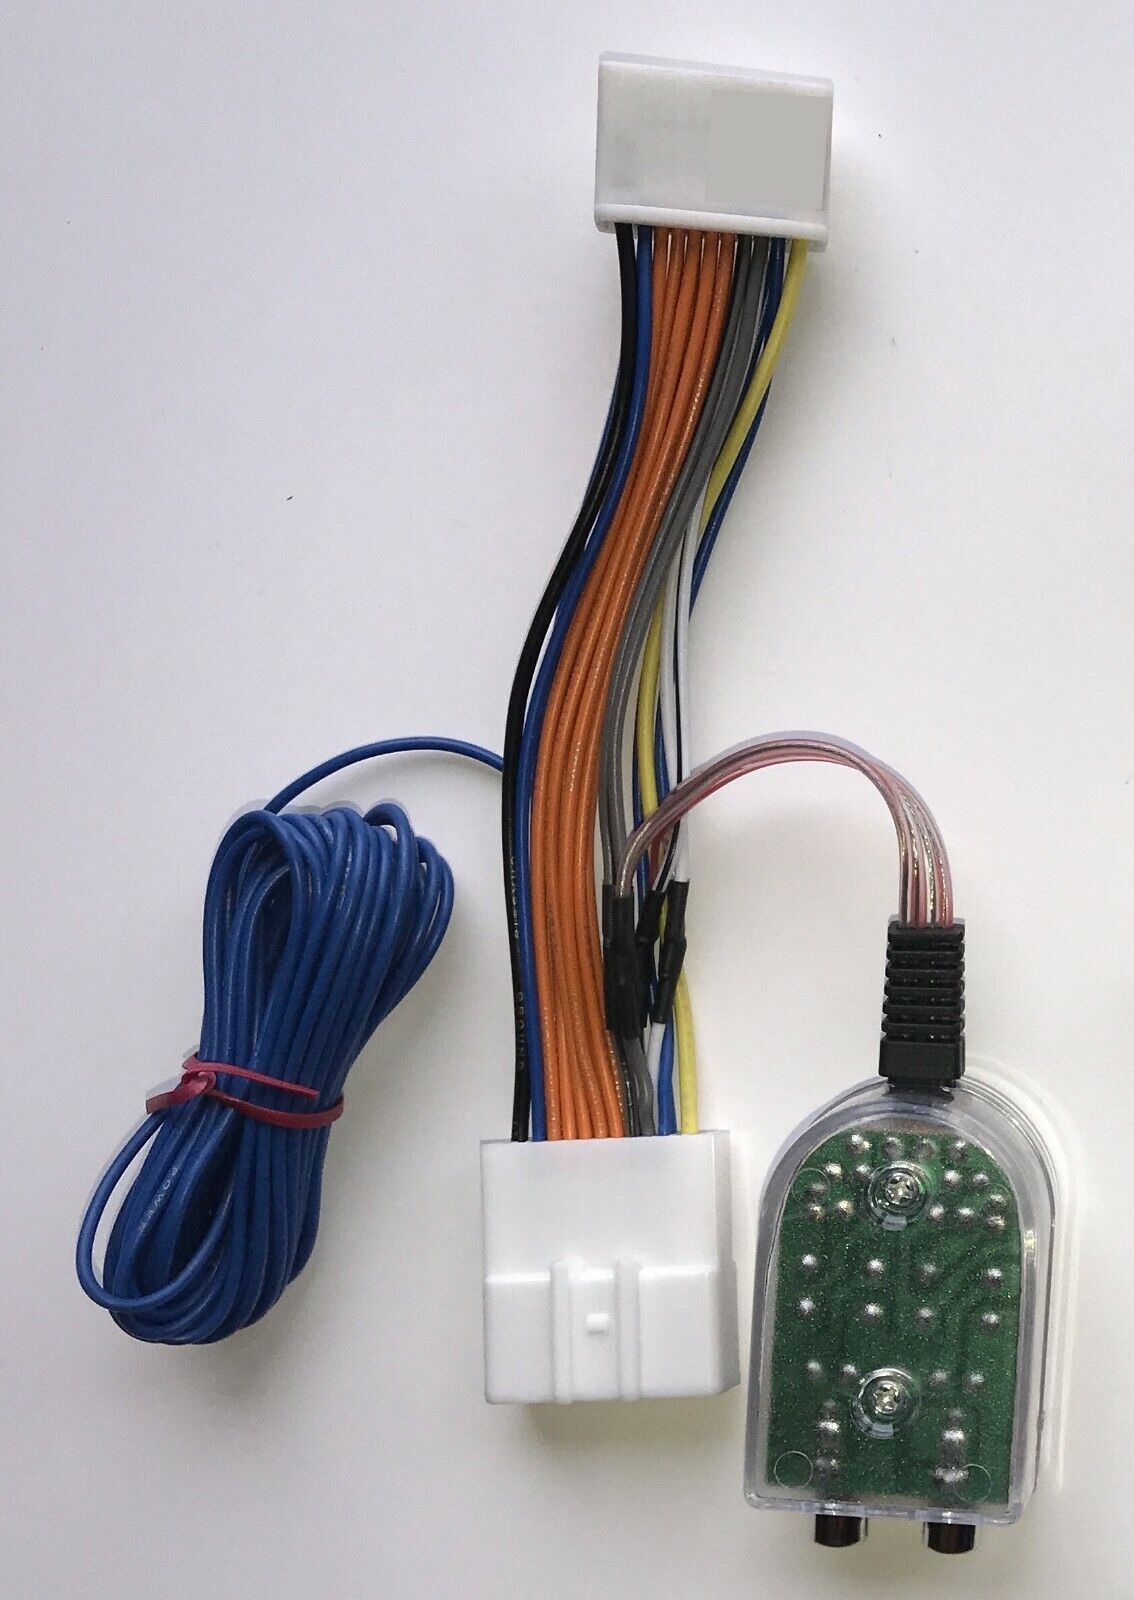
Factory Radio Add A Subwoofer Amplifier Plug and Play Harness Fits Nissan SubaruWant to add a subwoofer to your original stereo?
Don?t want or know how to cut into your wiring?Take the wiring guess work out of the installation with this plug and play wire harness! Installation is as easy as 1, 2, 3!
- Remove your OEM factory radio
- Unplug the OEM factory wiring and plug in this wire harness
- Reinstall your OEM factory radio
What is it?
This wire harness provides a line out converter for connection to one set of RCA cables to provide an audio signal to an external amplifier. Also pre-installed on the harness is a remote amplifier turn on wire. This wire, along with a set of RCA cables, is run to your aftermarket amplifier. All that?s left for you to do is connect your own main power wire from your battery and a ground.
What you will receive
- One (1) plug and play wire harness
Alternate Options:
Need additional parts for your installation? Check out our other listings where RCA cables, bass knobs, and amps kits are included!
Compatibility Notes
- Audio volume to the amplifier can be adjusted by the dials on the harness. For easier access we recommend using an external volume knob.(Not included but we can provide one)
- If this is being installed on a vehicle with a \"premium sound\" system such as Pioneer, this harness may need to be connected at the Pioneer amp and not directly at the radio.
- A variety of wire colors may be used for the remote wire coming off the harness. Regardless of color, rest assured it is for the remote turn on of an amplifier.
MODEL From To City Express 2015 2018 FX35, FX50 2009 2013 G37 2008 2013 G35 2007 2008 G25 2011 2012 G25 2011 2012 G25 2011 2012 CX-5 2016 2016 370Z 2009 2020 Altima 2016 2018 Altima 2014 2015 Altima 2013 2013 Altima 2013 2013 Altima 2010 2012 Altima 2007 2009 Armada 2013 2015 Armada 2008 2012 Cube 2009 2014 Frontier 2016 2018 Frontier 2016 2017 Frontier 2013 2015 Frontier 2013 2015 Frontier 2012 2012 Frontier 2009 2011 Frontier 2009 2011 Frontier 2009 2011 Frontier 2008 2008 Juke 2015 2017 Juke 2011 2014 Kicks 2018 2019 Leaf 2018 2019 Leaf 2012 2017 Maxima 2016 2019 Maxima 2009 2014 Maxima 2009 2014 Maxima 2007 2008 Maxima 2007 2008 Murano 2015 2019 Murano 2009 2014 Murano 2009 2014 Murano 2009 2014 NP 300 2017 2018 NV 2015 2019 NV 2012 2014 NV200 2013 2018 Pathfinder 2013 2016 Pathfinder 2013 2016 Pathfinder 2008 2012 Quest 2011 2016 Quest 2011 2016 Quest 2011 2016 Rogue 2014 2018 Rogue 2012 2013 Rogue 2012 2013 Rogue 2012 2013 Rogue 2011 2011 Rogue 2008 2010 Rogue Select 2014 2015 Rogue Select 2014 2015 Rogue Sport 2017 2019 Sentra 2013 2018 Sentra 2007 2012 Sentra 2007 2012 Titan 2019 2019 Titan 2017 2018 Titan 2013 2015 Titan 2013 2015 Titan 2008 2012 Titan XD 2019 2019 Titan XD 2016 2018 Versa 2015 2018 Versa 2014 2014 Versa 2014 2014 Versa 2012 2013 Versa 2007 2011 Versa Note 2018.5 2019 Versa Note 2014 2018 Xterra 2014 2015 Xterra 2013 2013 Xterra 2009 2012 Xterra 2009 2012 Xterra 2008.5 2008.5 Forester 2014 2015 Forester 2009 2013 Impreza 2012 2014 Impreza 2008 2011 Impreza Outback Sport 2011 2011 Impreza WRX 2013 2014 Impreza WRX STI 2008 2012 Legacy 2012 2014 Legacy 2010 2011 Outback 2012 2014 Outback 2010 2011 WRX 2015 2015 XV Crosstrek 2013 2014 Equator 2009 2011 Equator 2009 2011 View more great items
Converter adjustment instructions:
- After completing all of the necessary connections, turn the adjustment pots all of the way down by rotating them completely counter-clockwise.
- Turn the stereo system on and adjust the main volume control on the stereo to approximately 3/4 maximum volume.
- Select one of the adjustment pots and turn it slowly clockwise until you notice audio distortion and then stop.
- Turn the remaining pot to the same position as the previously adjusted pot.