When you click on links to various merchants on this site and make a purchase, this can result in this site earning a commission. Affiliate programs and affiliations include, but are not limited to, the eBay Partner Network.
Price: $35.00
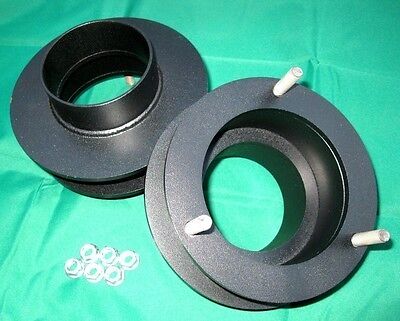
Dodge Ram 2\" FRONT Leveling Lift Kit:
2006-2010 Dodge Ram 1500/2500/3500 Megacab 4X4
THIS KIT DOES NOT FIT 2WD MODELS.
STRONGEST SOLID CARBON STEEL FOR THE BEST PRICE
STAMPED CUT 1/4\" Steel
SEAMLESS TUBING
10.9 GRADE STUDS WHICH IS EQUIVALENT TO OE STUDS STRENGTH
TURN TABLE HIGH FREQUENCY PULSE WELDED WITH
DURABLE POWDER COATED FINISHPICTURE SHOWING ARE THE ACTUAL ITEMS
WINNER WILL RECEIVE 1 X PAIR OF FRONT LEVELING KIT & 6 NUTS TO GO WITH EACH STUD BOLT.
ALL PAYPAL TRANSACTIONS MUST BE SHIPPED TO A CONFIRMED ADDRESS ONLY AND PLEASE DO NOT ASK ME TO SHIP TO A NON-CONFIRM ADDRESS AS I WILL NOT EVEN BOTHER TO REPLY.
MONEY BACK GUARANTEE ! IF YOU DONT LIKE MY PRODUCT SIMPLEY SEND IT BACK IN 3 DAYS AFTER RECEIVED. BUYER IS RESPONSIBLE FOR THE COST OF RETURN FREIGHT.
INSTALLATION INSTRUCTIONS
- FRONT LEVELING KIT FOR DODGE RAMS
IMPORTANT NOTES:
- A certified mechanic is recommended to perform this installation with proper safety gears.
- Use locktite on all bolts related with this installation. Torque settings: 5/16” – 15-18 ft-lbs, 3/8” – 28-32 ft-lbs, 7/16” - 30-35 ft-lbs, 1/2” – 65-85 ft-lbs, 9/16” – 75-90 ft-lbs, 5/8” – 85-110 ft-lbs, 3/4” - 105-125 ft-lbs.
INSTALLATION PROCEDURE:
- Block the rear tires of the vehicle to prevent rolling backwards. Lift the front of the vehicle and support both left and right frames with jack stands then remove the wheels from both sides.
- Insert a floor jack under the front axle and raise the jack until it makes contact with the front axle.
- Starting with the driver side, mark on the stock coil spring and another directly across on the stock spring socket. It will allow you to reinstall the coil spring in the same position. Repeat the same procedure on passenger side.
- Locate the top of the shock absorber stud that is located in the engine compartment. Remove the shock stud nut, retaining washer and rubber grommet. You will need the rubber grommets when reinstalling. Repeat the same procedure on passenger side.
- Remove the (3) stock nuts from the upper shock tower and set upper shock tower and set upper shock tower aside for later reinstallation. Repeat the same procedure on passenger side.
- Remove the bolt from the lower shock mount on the axle. Remove the stock shock absorber from the engine compartment. Save hardware for reinstallation. Repeat same procedure on passenger side.
- Slowly lower the floor jack enough so that the stock coil spring can be removed. Remove the stock coil spring and the rubber isolator pad. You will need them for reinstallation. Remove the stock ring with bolts connected to it and disregard. Repeat the same procedure on passenger side.
- Lower the floor jack so that the stock coil spring and the new upper coil spacer can be installed.
- Install the stock coil spring into the stock location. Refer the mark made in step #3. Place the rubber isolator pad at the top of the coil spring and then insert the new coil spring spacer on top of the stock coil spring. Raise the floor jack until new coil spring spacer seats into the upper stock location. Repeat the same procedure on passenger side.
- Install the shock down through the engine compartment and secure the bottom of the shock into the stock location with stock hardware.
- Reinstall stock upper shock tower into stock location. Secure new coil spring spacer to upper shock mount using the provided 3/8” nuts. Torque to 35 ft-lbs. Repeat the same procedure on passenger side.
- Install the stock rubber grommet and retaining washer and secure the top of the shock to the upper shock mount. Repeat the same procedure on passenger side.
- Remove the floor jack from under the differential. Reinstall the wheels and remove the jack stands from under the vehicle. Vehicle alignment is required.
- Save all original parts removed so the vehicle can be return to stock specification.
- Re-torque is needed after the first 100 miles and every 1,000 miles or after each off road use.
Powered by eBay Turbo Lister
The free listing tool. List your items fast and easy and manage your active items.